February 27, 2011

Russian Tea Cakes

Bismillahir Rahmanir Raheem


My sister in law makes the best Russian tea cakes, hands down, Allahumma barak feeha. In fact, I don't think I ever knew what one was until I got married and heard about these famous cookies of hers. She has it down to a science, knowing just when to remove these delicate little balls of yumminess from the oven (before they start getting any color, by the way). Alhamdulillah, I can say from first hand experience hers are amazing but its been so long since I've had them from her hands and well, there's only so long a person can wait before their next Russian tea cake!


So I attempted to make them; I say "attempted" because in my mind they're just not as good as hers but even at their "worst", these are so delicious!  So light and crumbly with an unmistakeably almond flavor (some version called for walnuts, I went with the almond version as that's what I had more of). And with the seemingly never ending winter storms all around the country, why not bake something to match that wintery landscape outside?

(In case you're wondering, these aren't cakes at all but are little round cookies and also go by the name Mexican wedding cookies)

Russian Tea Cakes
1 cup butter, softened
1/2 cup powdered sugar
1 teaspoon vanilla (I used almond extract instead)
2 1/4 cup flour
1/4 teaspoon salt
3/4 cup finely chopped walnuts or almonds
powder sugar for rolling

1. Preheat oven to 400 degress

2. Beat butter, powdered sugar and vanilla until creamy, about 3 minutes on medium speed.

3. Carefully fold in flour and salt, being careful not to overmix.

4. Stir in nuts. Rolls into 1" balls and arrange on baking sheet 2 inches apart for 8 - 9 minutes. Keep a careful eye on them, do not let them brown at all! Remove from oven and roll in powder sugar while still warm. Set aside to cool and roll again for a final coating.

February 13, 2011

Homemade Samosas

Bismillahir Rahmanir Raheem

One of my biggest pet peeves is searching high and low for an authentic recipe and then finding things like Pad Thai made with spaghetti noodles or enchiladas topped off with mozzarella cheese. I have no problem with using substitutes when you're in a pinch but then please call it what it is, a sorry excuse of an imitation and not the real thing. A bit too harsh? You'll have to excuse me, I'm just so fed up with finding yet another FABULOUS samosa recipe that starts off with....(cue horror music)...an egg roll wrapper, ugh!

My ranting and raving is further justified by the fact that I grew up in a house where samosas (filling and wrapper included) were all made from scratch and lovingly shaped into imperfect fat squares, masha'allah. The accompanying chutneys (all homemade as well) were as varied in taste as they were in color: spicy green chili chutney, tangy black tamarind chutney, roasted coconut and cumin chutney, and the list goes on.


Yes, the dips are important. The filling is even more important, but the thing to trump them both is the dough itself. A complex mixture of both crispy and chewy. Thick enough to hold the savory filling, but thin enough to fry to a golden-brown perfection without any burned edges. For all these reasons you simply cannot use a spring roll/egg roll wrapper! I know what you're thinking, "but it's just so much easier!" Well you can quit your complaining 'cuz this recipe has a grand total of three ingredients (four if you count salt) and will come together before you could defrost a pack of spring rolls. 

The filling and shaping part are totally up to you. Traditionally you'll find vegetarian (potatoes and green peas version) or a non-veg (ground beef) versions. But I've also tried everything from green lentils to ground chicken and can happily say I've never met a samosa filling I didn't like! As usual, I urge you to use whatever you have. When it comes to shaping them you again have free rein to do whatever you like. My mother makes one big rectangle, plops spoonfuls of filling about 1" apart on the bottom half of the rectangle and then folds the top down over it. Using her fingers, she gently presses the dough down around the filling and then cut them into individual squares (adding a little brush of water in between the spoonfuls helps the dough stick better). I tried a little different technique, as you can see below (detailed instructions found in the recipe below), but in the end, I don't think it's the shape that matters when the final result is an authentic homemade treat. 
 

(makes about  10 - 12 samosas, depending on size)
3 cups flour
1 teaspoon salt
4 tablespoons melted butter
3/4 cup cold water, more if needed


1. Add melted butter and salt to flour, mix well. Slowly pour in half of water and mix with your hands. Continue to add the rest of the water, or more, until a soft, smooth dough forms.

2. Knead the dough by hand 10 minutes, or in a mixer for 5 minutes. Leave in a lightly oiled bowl, covered, until ready to use.

3. To shape and fill: break off golf ball sized rounds of dough, roll into a 6" circle. Cut in half, lengthwise. Using your finger, gently wipe the straight edge of the half-circle with water and fold over, pressing flat sides together. Carefully lift up, you'll now have a cone to fill. Either hold in one hand and fill with other, or place in a narrow glass while you fill. Using water to carefully seal up the last side.

Samosa Filling
2 potatoes, cooked, peeled and cubed
1 half of a medium onion, finely diced
2 green chilies (adjust to desired heat)
1/2 teaspoon mustard seeds
1/2 teaspoon fennel seeds
1/2 teaspoon cumin seeds
1 teaspoon garlic & ginger paste
1/4 teaspoon turmeric
1/2 teaspoon red chili powder (adjust to desired heat)
1 teaspoon lemon juice
1/4 cup chopped cilantro
salt and pepper to taste

1. Add a couple teaspoons of oil to a pan set over medium heat. Add mustard, fennel and cumin seeds and cook until they begin to pop. Add garlic & ginger paste and cook 30 seconds. Add onion and cook until soft, about 3 minutes.

2. Next add in potatoes, chilis, turmeric, chili powder, salt and pepper. Cook for a few minutes, until potatoes are coated with spices. Add lemon juice and cook until liquid has dissolved (my potatoes were a bit undercooked, so I added water to finish off the cooking). Mix in chopped cilantro at the very end.

3. Lightly mash everything up. Set aside to cool.

* The chutney pictured was quickly whipped up from tamarind paste, sugar, cumin powder all thinned out with some water.

February 8, 2011

Roll-Out Sugar Cookies

Bismillahir Rahmanir Raheem


In the wonderful world of cookies there are two main categories of cookies: drop cookies and roll-out. The first consist of thick and marvelously gloppy cookie doughs that are dropped in heaping teaspoonfuls (or portioned out with a small sized ice cream scoop) on a sheet and baked as is (like these and these). A roll-out cookie on the other hand is a firm and smooth dough that is rolled out and cut out into shapes and then baked (like these).

Drop cookies are dropped onto a cookie sheet in mounds because the spread out while baking. Roll-out cookies do not spread, so they keep whatever cute shape you cut them out in. Let me take that back, they're not supposed to spread, so they keep whatever cute shape they're supposed to be. After so many failed attempts at the perfect roll-out sugar cookie, I gave up and settled for a delicious sugar cookie in a drop form. And don't feel sorry for me, cuz those babies are delicious.


But then you have winters like the one we're in now where the kids don't get to go outside for a week or two at a time and are going stir crazy in the house and you just need something simple and fun to do right away. Oh and did I mention almost every single roll-out cookie requires chilling in the fridge for at least an hour? Thats because chilled dough spreads less in a hot oven than room temperature dough. But when you have kids crawling up your legs the last thing you need to worry about is chilling anything for any amount of time.


When I read this recipe that required no chill-time at all, I was highly skeptical but just had to try it. And alhamdulillah, it worked! The dough came together in no time, the kids were cutting away they're favorite shapes and in less than 15 minutes they were ready to eat. I wouldn't recommend keeping the leftover dough in the fridge for too long as its a pretty firm dough as is and would then require quite some time to come to room temperature to be soft enough to roll out. Have fun and happy baking!


Roll-Out Sugar Cookies

Ingredients

1 cup butter 

1 cup sugar 

1 large eggs 

2 teaspoons baking powder 

1 teaspoon vanilla 

2 3/4 cups flour 

1/2 teaspoon salt

Directions

  1. Pre-heat oven to 400F degrees.
  2. In a large bowl cream butter and sugar with electric mixer. Beat in egg and vanilla.
  3. In a separate bowl, mix flour,salt and baking powder.
  4. Add 1 cup at a time,combining after each addition. You will need to add last 3/4 cup by hand. Do not chill dough it will be stiff.
  5. Divide dough into 2 balls.On floured surface roll out to 1/8 inch thickness.Use any cookie cutter and cut away.
  6. Bake for 6-10 minutes or until edges of cookie are light brown. Don't over bake! Remove from oven and allow to cool on cookie sheet for 2 minutes before removing and allowing to cool all the way.
  7. Eat as is or decorate with icing. Allow to fully cool before applying icing. 

Icing
1 cup powdered sugar
1/2 teaspoon light corn syrup
milk (add 1/4 teaspoon at a time until desired consistency)

1. Mix sugar and corn syrup. Add the smallest amount of milk and mix completely, until you get a thick but pourable consistency. Tint with your choice of food coloring.
2. Use a frosting bag to decorate, or a ziplock bag with a corner snipped off.

    February 7, 2011

    Orange Yogurt Cake

    Bismillahir Rahmanir Raheem


    There are many benefits to cooking with whats in season. First, you won't be paying an arm and a leg for a couple strawberries in the middle of January and second, you're gonna get some good produce. I mean good. This coming from a woman who rarely eats fruits and vegetables (I know, I know!), the oranges are super juicy and sweet right now, go stock up!

    And then as you eat your way through the second 5lb bag of the week you'll realize you've been accumulating a lot of orange peels and there are better things to do with those than just throw them away. The zest of a citrus (meaning, the outer part of the skin before you reach the white part, or pith) is loaded with essential oils and is extremely concentrated in flavor. Did you know orange zest can actually help lower your cholesterol? So in that case, this cake could actually be good for you? ;)


    If you ever eaten any fruit-infused cake then you'll know that they can be really boring and really dry. Using both orange zest and orange juice takes care of the boring part and the extra help of the orange infused syrup more than enough makes up for anything being dry. This cake smells amazing out of the oven but for best flavor try and wait until it cools to room temperature. At that point, all the syrup will have been absorbed and distributed through out the cake. Or you can do what I did and have a slice warm and then a slice after its cooled, I won't tell!

    Orange Yogurt Cake
    (adapted from here)

    2 1/2 cups unbleached white flour
    2 teaspoons baking powder
    1 teaspoon baking soda
    1/2 teaspoon salt
    1 teaspoon cinnamon
    3 eggs
    1 cup sugar
    3/4 cup melted butter
    2 teaspoons orange rind, grated
    1 teaspoon vanilla
    1 cup plain low-fat yogur
    1 /2 cup orange juice ( I use fresh-squeezed)

    Syrup
    1 cup sugar
    1/2 cup water
    1/2 cup orange juice
    1 cinnamon sticks
    2 -3 pieces orange peel

    Directions 

    1.Preheat the oven to 350°F Butter and flour a 9x13 cake pan (I halved this recipe and used an 8" round cake pan

    2. Combine the dry ingredients (the first five listed). 

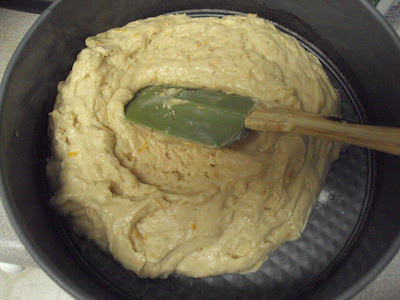
    3.Beat together the eggs and sugar until foamy. Add the butter, grated orange peel, and vanilla. Add yogurt, juice, and dry ingredients to the egg mixture gradually. 

    4.Bake for 45 minutes, until the cake is firm and golden. 

    5. While the cake bakes, combine all syrup ingredients in a small saucepan and bring quickly to a boil. Lower heat and simmer for 10 minutes. 

    6.Allow to cool, and remove the cinnamon stick and orange peel. 

    7.Poke holes into the top of the cake and pour the syrup over it while the cake is still warm. It's going to seem like a lot of syrup, but keep pouring.

    February 4, 2011

    Super(bowl) Food

    Bismillahir Rahmanir Raheem

    This post was originally written for The Sisters Who Blog Network. Check out an amazing group of Muslimah bloggers and a world wide network of inspiring and creative sisters at Sister Who Blog!

    Its that time of year again: The Superbowl. The weekend of mega-million dollar TV commercials and a seemingly 24 hour "pre-game". Oh ya, and I guess there's a football game of sort on as well. I'm not such a fan of the sport and can only tolerate a few minutes of watching here and there but even I get excited for this weekend. Do I have a favorite team? No. Is my home state being represented? Nope. Do I love game-day snack food? You betchya! To help get you in a Superbowl snack food state of mind, here's a round-up of some classic Muslim Wife Kitchen recipes to make your game day delicious:

    1. Pizza dough can go a long, long way: Weather you opt for a couple trays of mini-pizzas or a platter of calzones, this pizza dough recipe is where you'll start off.

    In a pizza rut and need some new flavor inspiration? Check out these MWK pizza options:


    2. Dips: Few things pair as good as football and dunking...chips, that is. This tomatillo salsa recipe is not only bright and refreshings, its super simple too! If you do opt for a classic guacamole, give it that extra something by using sour cream (piped on with a ziplock bag with a corner cut off) to resemble a football field!


    3.Fingerfoods: You're gonna need to keep your hands free to do all the high fiving and touchdown signs during the game (you know you do it, just admit it), which is finger foods are the way to go for the best viewing experience. If your crew likes it hot, try out these jalapeno poppers. Remove the seeds to tame the heat if you must!

    And does anything scream FOOTBALL more than a soft pretzel dunked in hot cheese sauce? A game-day must in our house!


    5. Maincourse: The game will be airing in the evening which puts us smack in the middle of dinner time. If you need some main course fare, these easy dishes will easily feed a crowd.


    The key to this easy pasta dish is baking it in a springform pan to maintain the individual layers. This really can feed a football team!


     If you're already making guacamole, why not grill up some quesadillas to go with it? This spicy shrimp and spinach combo is delicious!


    6. Sweet Tooth: Last, but certainly not least, is the sweet ending to celebrate your teams victory or console a losers heart ;) To make this football cake, simply bake your favorite chocolate cake recipe (I use the same one for my cupcakes) in a round pan. Then divide the cake in half, cut off a 1 inch sliver going the length of the cake and reattach your two halves. This will give you an oval football shape. 

    For these cute football cupcake toppers, simply pipe some melted chocolate onto wax paper in the shape of footballs. Once they are completely cooled, slowly lift off with a spatula and decorate with white frosting. 

    I use the Bakers one bowl brownie recipe and always end up with rich, fudgy brownies. Once they're completely cooled, cut out in a football shape (Wilton has a cookie cutter), frost and decorate and you're ready to go.

    February 3, 2011

    Chicken Gyro Pizza

    Bismillahir Rahmanir Raheem


    Its no secret we like our pizza around here, but every now and then even pizza lovers like ourselves need a refreshing break from the norm. Sure, there's the roasted garlic pizza, a grilled eggplant pizza, a barbecue pizza, heck there's even a dessert pizza, so why not add another to the mix?


    The inspiration for this chicken gyro pizza was my craving for a good, authentic gyro and my need to use up leftovers (as usual!). The star of this dish is the slow marinated chicken in shwarma spice which you can find at any Arab or international market (alternatively you can make your own spice mix). From there, I thought about my favorite gyro/shwarma toppings and settled on lots of olives and caramelized peppers and of course, the tzatziki sauce. Sure, authentic tzatziki should have some hint of cucumber in it, but I didn't have any that day and made do with yogurt and dill weed.


    So next time you want a little change from the norm (or maybe a quick and easy Superbowl dinner?) think outside the box and try combining some of your favorite flavors with traditional recipes. You may be pleasantly surprised with the results!


    Chicken Gyro/Shwarma Pizza
    1 pizza dough recipe
    1lb chicken boneless, skinless chicken breast
    1 tablespoon garlic & ginger paste
    1 tablespoon yogurt
    1 tablespoon lemon juice
    salt and pepper to taste
    2 teaspoons shwarma spice mix
    your choice of toppings (olives, onions, peppers)
    shredded mozzarella
    tzatziki sauce:
    2 tablespoons yogurt
    1 teaspoon dried dill weed
    pinch of garlic powder
    salt and pepper to taste

    1. Cut chicken into bit-sized pieces. Combine chicken with garlic and ginger, 1 tablespoon yogurt, lemon juice, shwarma spice mix, and salt and pepper to taste.Marinate at least 30 minutes or upto 3 hours. 

    2. Cook chicken pieces on medium high heat just until no longer pink. Its okay if its not cooked all the way, it will continue to cook in the oven on the pizza.

    3. Spread thin layer of pizza sauce or tomato paste on rolled out out pizza dough, top with chicken and toppings of your choice. Bake at 420 F on lowest rack in oven for 25 - 30 minutes until crust is golden and cheese is bubbly. 

    4. Drizzle sauce on pizza as soon as it comes out of the oven.